- Editor's Note: Stephen Payne, SHSU Online instructional design specialist, presents a tongue-in-cheek treatise on the agony and ecstasy (but mostly agony) of using the group feature in Blackboard.
As a professor experienced in the use of Blackboard, you have no doubt spent countless hours working on perfecting your course, a noble task indeed. You’ve created tests, writing assignments, all seems well.
But you’ve decided that your discussion boards need a special touch, something to help personalize the experience for the student. How do I organize students and let them socialize with their peers? It is at that moment that you hear a faint siren call from the winds.
Blackboard, like most capricious deities, has left forbidden fruit lying in its forests to tempt even the most stalwart of academic practitioners. This fruit is the Groups function, and it will lead you toward the use of group discussion boards.
Up to this point, you have remained only in the safety of the all-class area of your course... but now, you have decided to venture into the realm of monsters, and utilize the groups. Below is a guide for braving this wilderness.
Step 1: Creating the Group
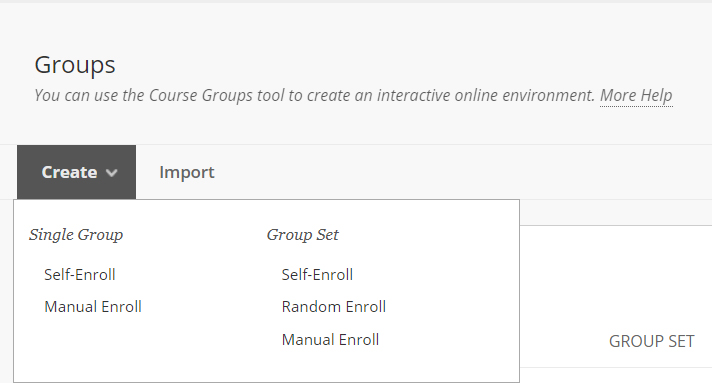 Your first step is creating the groups themselves, which you do by creating the Group Set first. Sounds complicated? Welcome to groups!
- In the Blackboard course, click the Users and Groups area under Course Management
- Click the Groups link from the drop down menu
- Click the Create tab in the Action Bar. For the first time adding groups for a course, select Random Enroll option under the Group Sets
- Name the Group Set “Groups.” No need for any other names
- In the Tool Availability section, unselect all options except the Discussion Board option, and then select the “Do not allow student group members to create forums”
- In Module Personalization Setting, deselect “Allow Personalization”
- In Membership, determine the number of groups by setting the Number of Groups. Then, select “Distribute the remaining members amongst the groups”
You have made it past the first step! Time to continue on your quest.
Step 2: Creating discussion forums: I hope you like doing things multiple times!
Now it’s time for you to add the discussion forums to your course. Here’s where the real fun begins with groups. In each group landing page, you must enter the Group Discussion Board link in Group Tools.
Here, you’ll encounter a page much like the Discussion Board link in the all class area, and you’ll populate your forums like in the all-class area!
Finished? Great! Now repeat these steps for the rest of the groups.
You’re going to need to manually recreate what you did in the first group discussion board page in all the other group discussion pages. No, Blackboard doesn’t let you just copy whole forums from one group to another... you’re going to have to do this manually. Plus, each group is going to have their grade center column, so be sure to give each forum a unique name to distinguish them in the Grade Center, like G1: Introduction, G2: Introduction, etc.
That also means setting dates and point values in each individual forum. The fun never stops!
Step 3: Populating the Group
You’ve created your groups and populated the forums with appropriate assignments, and lo and behold, the new semester is upon you! Time to populate those groups!
- After the initial groups are created, students can be added by clicking the Users and Groups area from the left-hand navigation on the course menu and then choosing “Groups” from thedrop down menu
- On the Groups page, select “Group Sets” tab on the top right of the page, and when the Group Sets page, loads click the chevron next to named set (should be named Group) and select “Edit Group Set Membership” from the drop-down menu
- On the Edit Group Set Membership page, all the groups should be displayed with their members listed. At the start of the semester, these groups will all be empty. By clicking on the Randomize Enrollment, you can populate all the groups at once and Blackboard will try to evenly distribute users among groups.
- Be sure to click the Add Users buttons in any of the groups to make sure there’s no students who haven’t been assigned. When you click this, a pop-up page will appear listing all students not currently assigned to a group. You can either add them all to one group or divide them up among the groups by adding one or more to a single group at a time, clicking submit, then clicking the Add Users button in another group and repeating the steps. (Note: It’s best to add students to any group that has a smaller number of students then the rest.)
- When finished adding the students, click the submit button on the Edit Group Set Enrollment page and the students should now be assigned to a group
Step 4: That Quirky Group Discussion Course Link
 You’re not the type of sadist to create groups and then leave your student no way to access them, are you? Of course not! So you’ll need to put links in your course for the students to get to their discussion assignments.
- Go the section of the course you have your work material, based on however you have the course split up (unit/session/chapter)
- Once you’re in the folder you want, click the Tools option from the Action Bar. If this item is to the link to the all-class discussion board, click “Discussion Board” from the drop-down menu. If it links to the groups, click “Groups”
- When you’re on the Create page:
- If this is an all-class area, select whether to link to the Discussion Board Page (the students will be taken to a landing page where they can see all available forums) or Select a Discussion Board Forum if you want to link to a specific forum
- If this is a Groups link, On Create Link page:
- All-Class: Name the link, best practice is to call it the same title as the forum topic you’re linking to: (i.e.: Discussion #1; Chapter #1 Discussion, etc.) then fill out the text description, again best practice to use the language from the forum topic. Then fill out the date information
- Groups: Name the Link, best practice is to call it the same title as the forum topic you’re linking to: (i.e.: Discussion 1, etc.) then fill out the text description, again best practice to use the language from the forum topic. Then fill out the date information so it matches what the availability you set on the forums
- The item will appear in the appropriate session you placed it in
Step 5: The First 12 days, An Exercise in Endurance
Okay, you’ve populated your groups and the semester has started... time to exhale, right? Actually, your work is not yet finished! Students are still free to join or drop classes through the first 12 class dates of the semester, which means late sign-ups to your course need Group access too! It’s your responsibility during this time to monitor enrollment and make sure all new students are given access to groups as well.
- After the semester has begun and the groups have been populated, additional students can be added by clicking the Users and Groups area from the left-hand navigation on the course menu and then choosing “Groups” from the drop down menu
- On the Groups page, select “Group Sets” tab on the top right of the page, and when the Group Sets page loads, click the chevron next to named set (should be named Group) and select “Edit Group Set Membership” from the drop-down menu
- On the Edit Group Set Membership page, all the groups should be displayed with their members listed. By clicking on the Add Users buttons in any of the groups, a pop-up page will appear listing all students not currently assigned to a group. You can either add them all to one group or divide them up among the groups by adding one or more to a single group at a time, clicking submit, then clicking the Add Users button in another group and repeating the steps. (Note: It’s best to add students to any group that has a smaller number of students then the rest.)
- When finished adding the students, click the submit button on the Edit Group Set Enrollment page and the students should now be assigned to the group of your choosing
Step 6: Future Sessions: Sharing the Experience With Your Instructional Designer
So, the semester has ended, and it’s time to prepare for your next teaching session, a course copy to the next semester will do nicely. Well, there’s one little hiccup that Blackboard has failed to amend: When you copy courses with group discussions in them, the old posts get copied with them. This means that each individual group forum will need to be cleaned out each semester. Depending on how many groups and how many forums you have, you and your instructional designer can look forward to repeating this fun each semester!